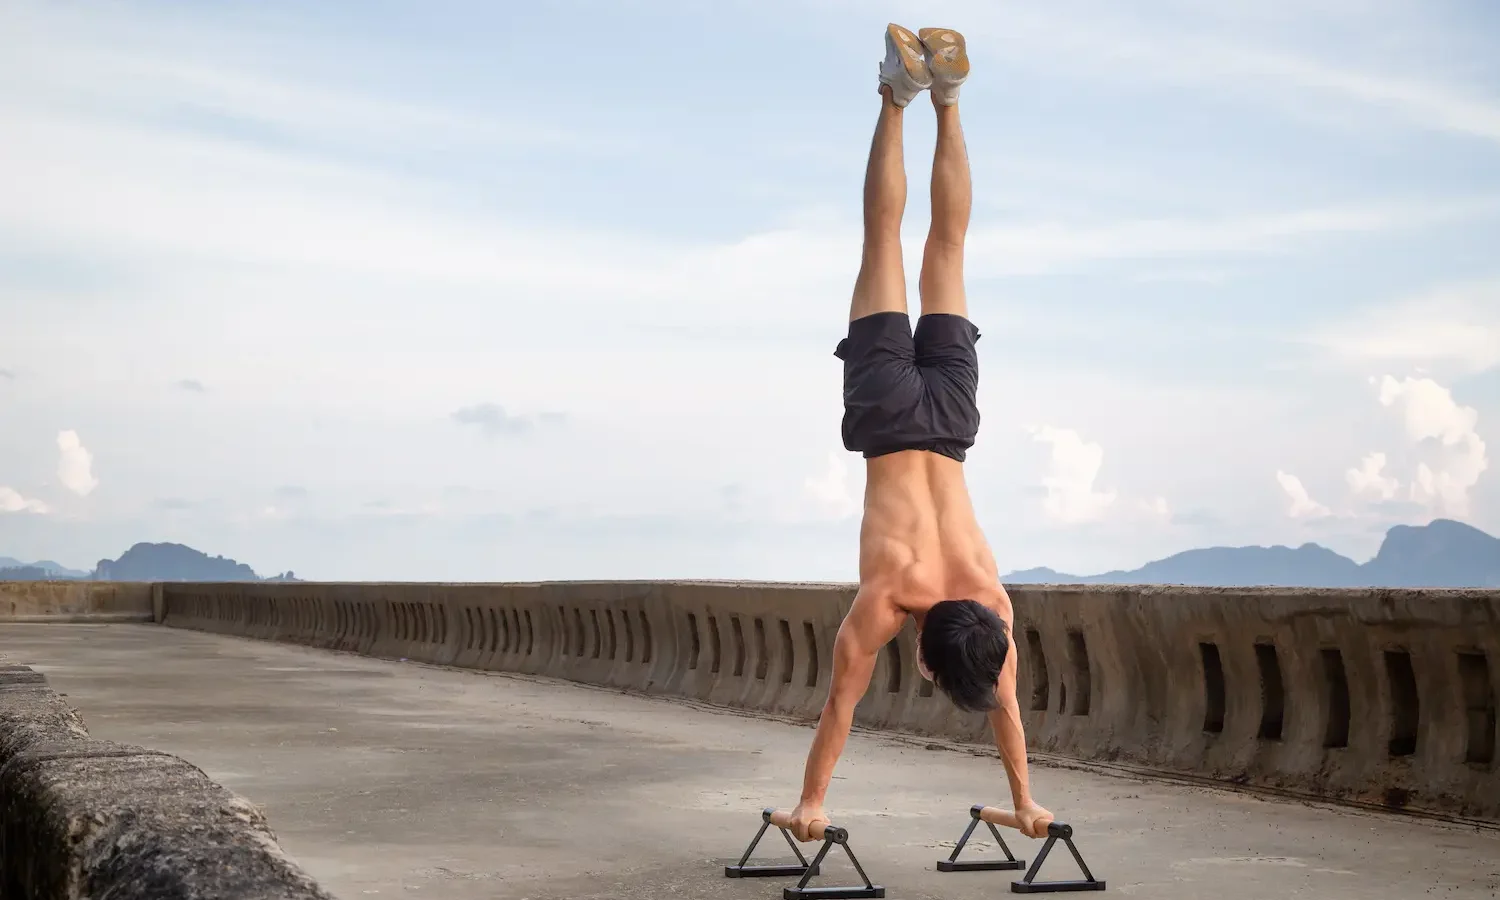
The handstand push-up is the bodyweight equivalent of a heavy overhead press — and then some. You press your full bodyweight upside down, vertically overhead, from a handstand position. Few exercises build shoulder strength, scapular control and core stability the way HSPUs do.
This guide covers the wall-supported handstand push-up — the practical version for 99 % of athletes. Free-standing HSPUs are an entirely separate skill.
What is the handstand push-up?
The handstand push-up (HSPU) is a vertical pushing exercise performed in an inverted position. Hands on the floor, body upside down (heels lightly touching a wall for balance), you bend the elbows to lower the head toward the ground, then press back up to full elbow lockout.
Because your full bodyweight loads the shoulders directly, this is one of the most demanding shoulder exercises possible without weights. It also requires significant wrist mobility and tolerance to inversion — both skills that need building before chasing rep PRs.
Muscles worked
| Muscle group | Role | Contribution |
|---|---|---|
| Deltoids (anterior + middle) | Primary mover, shoulder press | ~50 % |
| Triceps brachii | Elbow extension | ~20 % |
| Trapezius, serratus anterior | Scapular control, upward rotation | ~15 % |
| Pectoralis major (upper) | Press support | ~10 % |
| Core, glutes | Body line stabilisation | ~5 % |
The HSPU targets the same primary muscles as the standing overhead press but with much more scapular and core involvement. It’s the bodyweight king of shoulder exercises.
How to handstand push-up: 5 steps
-
Kick up to wall handstand
Hands on the floor ~20 cm from the wall, shoulder-width apart, fingers spread. Kick one leg up to handstand position, the other follows. Heels lightly touch the wall. Body in a straight vertical line.
-
Set the body line
Hands fully active — fingertips gripping the floor for balance. **Push through the shoulders** (active shoulder, scapulae upwardly rotated). Squeeze glutes and core. No banana arch.
-
Lower with control
Bend the elbows in a 2-3 second descent. Elbows track at about 45° to the head. **Lower until the crown of the head lightly touches the floor.** Maintain body line — no piking.
-
Pause at the bottom
Brief pause when the head touches. No bouncing off the floor. Maintain wall contact with the heels for balance — don't over-arch to "lean" into the wall.
-
Press back up
**Press explosively** — drive the floor away through the hands. Triceps extend. Reach the top with arms fully locked and shoulders fully shrugged up. Reset, repeat. Kick down with control after the set.
Common mistakes to avoid
Variations & progressions
- Pike push-up. Feet on floor, hips piked high. Easier — entry-level vertical press.
- Elevated pike push-up. Feet on a bench, hips piked. Steeper angle, closer to HSPU.
- Wall walks. Walk feet up the wall to handstand position. Builds tolerance and confidence.
- Negative HSPU. Lower from handstand in 5-8 seconds, kick-down to reset. Builds eccentric strength.
- Deficit HSPU. Hands on two parallettes or plates — increased range of motion.
- Free-standing HSPU. No wall support. Separate skill — gymnastic level.
- Overhead press. Standing barbell version with progressive loading.
Sample workout: 12-week handstand push-up progression
Train 2-3 times per week. Start with pike work if you can’t comfortably hold a wall handstand for 30 seconds.
| Weeks | Progression | Sets × reps |
|---|---|---|
| 1-3 | Pike push-up | 4 × 8 |
| 4-6 | Elevated pike push-up | 4 × 6 |
| 7-9 | Wall handstand holds + negative HSPU | 3 × 30s holds, 3 × 3 negatives |
| 10-12 | Full wall HSPU | 4 × 3-5 |
Frequently asked questions
How long to learn the handstand push-up?
3-9 months for most adults with progressive training. Strong overhead pressers (60+ kg overhead press) usually get there fastest. The limiting factor is rarely strength alone — it’s confidence inverted, wrist mobility and the scapular control of pressing overhead.
How close should my hands be to the wall?</h3
15-25 cm from the wall. Closer = harder balance, more vertical. Further away = banana arch, more shoulder strain. Start at 20 cm and adjust based on what feels stable for you.
HSPU or overhead press?</h3
Both. Overhead press wins for progressive loading and pure pressing strength. HSPU wins for shoulder stability, scapular control and inversion tolerance. Many strong pressers can’t do HSPUs because they lack the scapular control — that’s a gap worth closing.
My wrists hurt in handstand — what should I do?</h3
Wrist mobility takes time to build. Use parallettes or push-up handles to keep wrists neutral. Train wrist mobility daily (front/back loaded stretches). If pain persists, defer HSPU and work pike push-ups instead.
Should the head touch the floor?</h3
The crown of the head lightly touches at the bottom — full range. Don’t bang the head, don’t crash. If your range is limited, work the deficit progression (hands on parallettes) so the head doesn’t hit before the elbow has fully flexed.
Related exercises
- Overhead Press: barbell shoulder press counterpart
- Push Press: explosive overhead loaded variant
- Dips: bodyweight pushing complement
- Pike Push-Up: HSPU regression
- Lateral Raise: shoulder isolation